The way to work with Windows applications on Raspberry Pi
WTware for Raspberry Pi
Thin client operating system
WTware for Raspberry Pi is thin clients operating system, that creates connections to Windows Remote Desktop Services. Raspberry Pi with installed WTware displays Windows Desktop and Windows applications, that are running on Windows Terminal Server, like usual office x86 computer with mstsc.exe
WTware — thin client operating system
To work with Terminal Server common practice is to install Windows on users computers and run Remote Desktop Connection. We recommend to remove users hard disks and boot WTware by network instead of Windows installation. The result in both cases — Windows Terminal Server desktop on users screen.
WTware is optimized for network boot, but thin clients may boot also from local media.
WTware is easy to configure, it includes services for network boot, it's graphic configurator makes workplaces tuning as simple as possible.
WTware works with all common RDP servers we know, up to Windows Server 2019.
WTware can connect to four Terminal Servers at the same time.
You can connect printer, bar-code scanner to thin client, logon to Windows by smart-card.
It's easy to replace workplace for all the settings are stored on server, programs are on server, user data is on server.
Invented by collective intelligence. Since 2003 we work to make WTware meet to all administrator desires.
WTware mission is to make user computers administration not more complicated than using electric kettle.
For more details about WTware for x86 devices see  official WTware site.
Raspberry Pi
Raspberry Pi is a credit card sized motherboard with memory and Broadcom ARM-processor, that costs $35 at ![]() English manufacturer site.
Monitor USB hub power is enough for Raspberry Pi, no need in additional power supply.
English manufacturer site.
Monitor USB hub power is enough for Raspberry Pi, no need in additional power supply.
You just plug in mouse and keyboard, connect it to monitor and you're ready to go.
WTware supports:
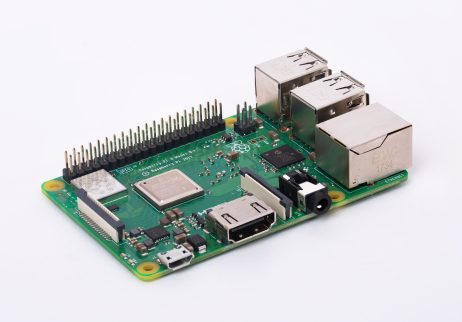
Raspberry Pi 4

- Broadcom BCM2711, Quad core Cortex-A72 (ARM v8) 64-bit SoC at 1.5GHz
- 1GB, 2GB or 4GB LPDDR4-2400 SDRAM (depending on model)
- 2.4 GHz and 5.0 GHz IEEE 802.11ac wireless, Bluetooth 5.0, BLE
- Gigabit Ethernet
- 2 USB 3.0 ports; 2 USB 2.0 ports.
- Raspberry Pi standard 40 pin GPIO header (fully backwards compatible with previous boards)
- 2 x micro-HDMI ports (up to 4kp60 supported)
- 2-lane MIPI DSI display port
- 2-lane MIPI CSI camera port
- 4-pole stereo audio and composite video port
- H.265 (4kp60 decode), H264 (1080p60 decode, 1080p30 encode)
- OpenGL ES 3.0 graphics
- Micro-SD card slot for loading operating system and data storage
- 5V DC via USB-C connector (minimum 3A*)
- 5V DC via GPIO header (minimum 3A*)
- Power over Ethernet (PoE) enabled (requires separate PoE HAT)
- Operating temperature: 0-50 degrees C ambient
- A good quality 2.5A power supply can be used if downstream USB peripherals consume less than 500mA in total.
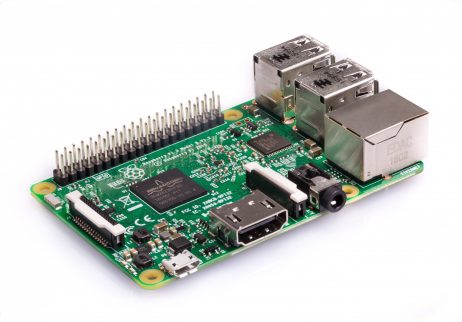
Raspberry Pi 3 Model B+, the final revision of Raspberry Pi 3 single-board computer
- Broadcom BCM2837B0, Cortex-A53 (ARMv8) 64-bit SoC at 1.4GHz
- 1GB LPDDR2 SDRAM
- 2.4GHz and 5GHz IEEE 802.11.b/g/n/ac wireless LAN, Bluetooth 4.2, BLE
- Gigabit Ethernet over USB 2.0 (maximum throughput 300 Mbps)
- Extended 40-pin GPIO header
- Full-size HDMI
- 4 USB 2.0 ports
- CSI camera port for connecting a Raspberry Pi camera
- DSI display port for connecting a Raspberry Pi touchscreen display
- 4-pole stereo output and composite video port
- Micro SD port for loading your operating system and storing data
- 5V/2.5A DC power input
- Power-over-Ethernet (PoE) support (requires separate PoE HAT)
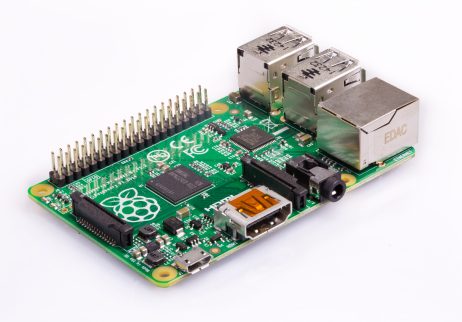
Raspberry Pi 3, the third generation Raspberry Pi
- Quad Core 1.2GHz Broadcom BCM2837 64bit CPU
- 1GB RAM
- BCM43438 wireless LAN and Bluetooth Low Energy (BLE) on board
- 100 Base Ethernet
- 40-pin extended GPIO
- 4 USB 2 ports
- 4 Pole stereo output and composite video port
- Full size HDMI
- CSI camera port for connecting a Raspberry Pi camera
- DSI display port for connecting a Raspberry Pi touchscreen display
- Micro SD port for loading your operating system and storing data
- Upgraded switched Micro USB power source up to 2.5A
Raspberry Pi 2, the second generation Raspberry Pi
- A 900MHz quad-core ARM Cortex-A7 CPU
- 1GB RAM
- 100 Base Ethernet
- 4 USB ports
- 40 GPIO pins
- Full HDMI port
- Combined 3.5mm audio jack and composite video
- Camera interface (CSI)
- Display interface (DSI)
- Micro SD card slot
- VideoCore IV 3D graphics core
Old Raspberry Pi versions were with another processor, 1 kernel and less than 1GB RAM. Please, pay attention when buying, for WTware won't work on versions other than Raspberry Pi 4, Raspberry Pi 3 Model B+, Raspberry Pi 3 Model B and Raspberry Pi 2 Model B.
WTware for Raspberry Pi
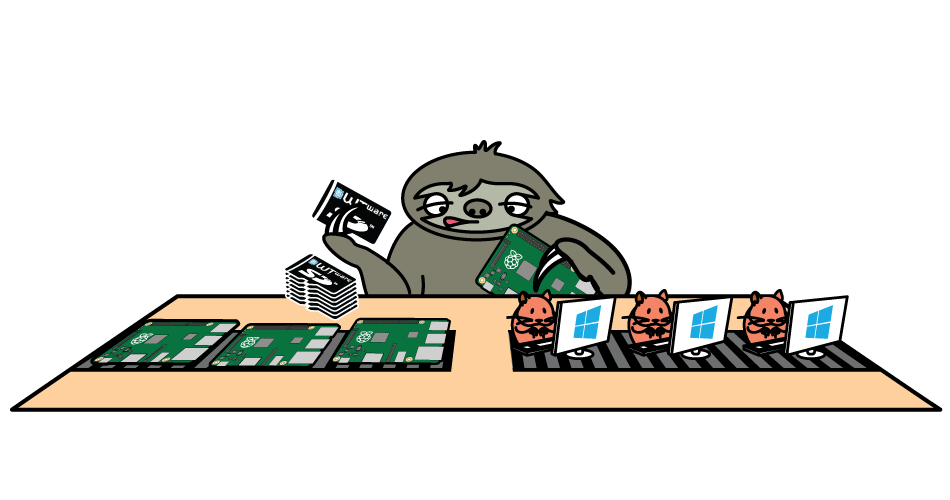
WTware for Raspberry Pi can boot from local SD-card or by network. Since Pi 3B+ you need microSD card only for local boot, network boot is performed automatically.
- Download and install WTware for Raspberry Pi on server.
- Run on server WTware graphic configurator, press button
 and create SD card for local boot (or for versions before 3B+ for network boot) using WTware wizard:
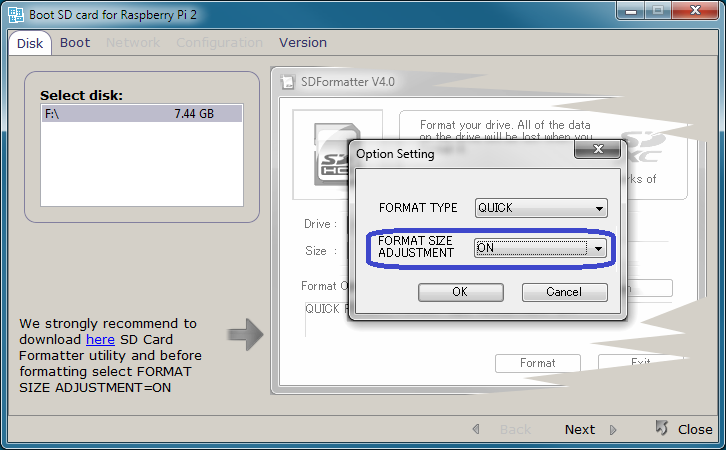
- Insert if needed card into Raspberry Pi.
- If you don't use WTware DHCP service and want to boot by network, specify in DHCP 067 parameter:
6.2.76\kernel7.img - Turn Raspberry Pi on.
Configuration files structure is the same as in WTware for all devices. You can use graphic configurator, just remember, that half of parameters are not supported yet.
Monitor resolution for Pi is stored in config.txt file on SD card, not in WTware configuration files. On Raspberry Pi manufacturer site you can find all settings for config.txt file. By default Raspberry Pi sets 1920x1080 resolution.
Raspberry Pi was tested with old cheap 18.5" Philips 191V monitor connected by HDMI-DVI cable in it's standart resolution 1366x768. If Pi works with such device in such resolution, then it should work with most other digital (HDMI and DVI) monitors in other resolutions. For 1366x768 resolution by HDMI-DVI cable these two lines must be specified:
hdmi_group=2
hdmi_mode=81
Sound, FAT32/exFAT/NTFS disks, printers, scanners, USB-COM ports redirection work now.
WTware for Raspberry Pi performance is sufficient for performing office tasks.
Version 6.2.76, June 19, 2026
Buy WTware licenses
What to buy
WTware license gives the right to use WTware software and removes banner "Evaluation copy" from the screen. For more details read WTware licensing terms.
License is valid for the current build and at least for all WTware releases during a year after payment (when license generation algorithm changes, new licenses we grant for free). No annual payments needed.
License is bound to terminal network card. Every case of network card outage is considered individually.
License is bound to MAC of the interface, that is used to connect to terminal server. Only one interface — either WiFi or Ethernet.
License cost
1 - 9 licenses
10 - 19 licenses
20 - 49 licenses
50 - 99 licenses
from 100 licenses
40 EUR per license
30 EUR per license
25 EUR per license
20 EUR per license
15 EUR per license
45 USD per license
35 USD per license
30 USD per license
25 USD per license
20 USD per license
How to buy
- You pay for the necessary number of licenses. Press the button above and follow the instructions: Make sure you specified working e-mail during registration in PayProGlobal.
- When we receive payment in no longer than three days we'll send you login and password to WTware license generator. This service will help you to generate licenses for terminals when needed without delays.
- You need to know terminal network card MAC-address to generate licenses. To determine it download WTware, boot terminal and you'll see MAC-address in popup menu that appears in right bottom corner.
- Generated licenses add to WTware license file using interface in graphical configurator or to terminal configuration file. Then terminal would work as full version without limitations (i.e. without the banner "evaluation copy", it's the only limitation).
Videos
Andrey Kovalev
WTware technical support
Before contacting techsupport make sure you saved terminal log.